Desarrollo Móvil en Android
Aprende a desarrollar aplicaciones móviles para Android y algo mas
Impartido por Jorge Luis Hernández C. / @lesthack
Marzo 2013
¿De que va el curso?
El Curso de desarrollo móvil esta diseñado para:
- Conocer y aprender tecnologías importantes en el desarrollo móvil.
- Conocer y aprender herramientas que faciliten y ayuden en el desarrollo en general.
- Conocer y desenvolver buenas practicas como programadores que somos.
- Desarrollar aplicaciones prácticas que ayuden al entendimiento de los conceptos aprendidos.
Tecnologías que aprenderas
Native Development
Desarrollo bajo el SDK de Android para aplicaciones nativas, poderosas y veloces.
PhoneGap + Jquery Mobile + Algo mas
Desarrollo bajo tecnologías web aplicadas en dispositivos móviles. Rápidas, bonitas y faciles de crear.
Node.js, WebSockets And Git.
- Desarrollo de sistemas de comunicación sincronos y asincronos.
- Manejo de sistema de control de versiones con Git.
- Metodologías de desarrollo Ágil.
Recomendaciones
Conocimientos previos
- Conocimientos intermedios en Programación
- Conocimientos básicos en HTML
- Conocimientos básicos en CSS
- Conocimientos básicos en Javascript
- Disposición, Disciplina y muchas ganas de Aprender
Software Necesario
Guias de instalación
Contenido
Sesión 1
Android SDK Parte 1
Sesión 2
Android SDK Parte 2
Sesión 3
PhoneGap + Jquery Mobile Parte 1
Sesión 4
PhoneGap + Jquery Mobile Parte 2
Sesión 5
Tools with Node.js, Websockets and Git
Sesión 6
Generando un Proyecto
Recomendación Contenido
Sesión 1
PhoneGap + Jquery Mobile Parte 1
Sesión 2
PhoneGap + Jquery Mobile Parte 2
Sesión 3
Git + Utilerias
Sesión 4
Android SDK Parte 1
Sesión 5
Android SDK Parte 2
Sesión 6
Generando un Proyecto
Encuesta de Iniciación
http://goo.gl/CL0z7
Resultados encuesta
Sesión 1
PhoneGap + Jquery Mobile Parte 1
Introducción al desarrollo movil
Penetración de las plataformas mobiles en el mercado (2012)
- Android 75 %
- iOS 14.9 %
- Backberry OS 4.3%
- Symbian 2.3 %
- Windows Phone OS y Windows Mobile 2.0 %
- Otros 1.5
Fuente Original: http://es.wikipedia.org/wiki/Sistema_operativo_móvil
PhoneGap 2.4.2
PhoneGap is a free and open source framework that allows you to create mobile apps using standardized web APIs for the platforms you care about.

¿Que es PhoneGap?
- HTML
- CSS
- Javascript

Aprendamos entonces Jquery Mobile
Guía Jquery Mobile
- Entendiendo jquery mobile
- Headers and footers
- Una sencilla Aplicación
- Los formularios
- Listas
- Autocompletado
- Dialogos
- Panels
- Acordiones
- Toolbars
- Grids
- Transiciones
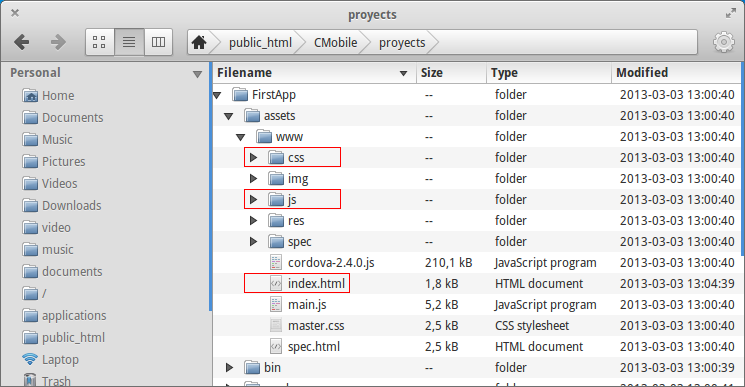
Estuctura Aplicación
-
ProyectoWeb
- index.html
-
Javascript
- main.js
- lib.js
-
CSS
- style.css
-
Images
- logo.png
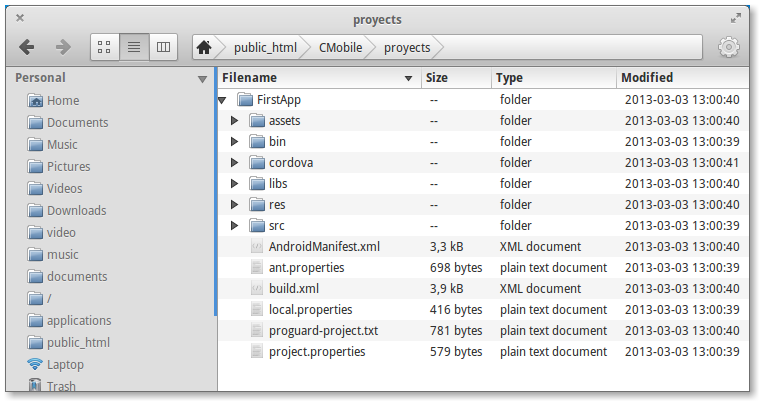
Iniciando un proyecto con PhoneGap
Nota: el directorio del SDK deberá esta incluido en la variable PATH Environment del Sistema Operativo.
create FirstApp
Como incluir el directorio del SDK en la variable Path Environment.
export PATH=${PATH}:/opt/android-sdk-linux/platform-tools:/opt/android-sdk-linux/tools
Estructura de un proyecto PhoneGap
Headers and Footers
Parameters:
- data-role="page"
- data-position="fixed"
- data-fullscreen="true"
- data-theme="name-theme"
Buttons
Buttons:
- data-role="button"
- data-inline="true|false"
- data-theme="name"
- data-mini="true|false"
- data-icon="name-icon"
- data-iconpos="notext|left|right|top|bottom"
Groups:
- data-role="controlgroup"
- data-type="horizontal|vertical"
- data-mini="false|true"
Forms Elements
Sliders:
- type="range"
- value="numeric"
- min="numeric"
- max="numeric"
- step="numeric"
- data-highlight="true|false"
- data-mini="true|false"
- data-theme="name"
- data-track-theme="name"
Range Slider:
- data-role="rangeslider"
- data-mini="true|false"
- data-theme="name"
Forms Elements
Flip Switch:
- data-role="slider"
- data-mini="true|false"
- data-theme="name"
Checkbox:
- type="checkbox"
- data-mini="true|false"
- data-theme="name"
- Groups [fieldset]
- data-role="controlgroup"
- data-type="horizontal|vertical"
- data-iconpos="right"
- data-mini="true|false"
- data-theme="name"
Forms Elements
Radiobutton:
- type="radio"
- data-mini="true|false"
- data-theme="name"
- Groups [fieldset]
- data-role="controlgroup"
- data-type="horizontal|vertical"
- data-iconpos="right"
- data-mini="true|false"
- data-theme="name"
Forms Elements
input Element
- type="text"
- data-mini="true|false"
- data-theme="name"
- data-clear-btn="false|true"
- type="search"
textarea Element
Listviews
ul | ol Elementes
- data-role="listview"
- data-inset="true|false"
- data-filter="true|false"
- data-filter-placeholder="Search fruits..."
- data-filter-reveal="true|false"
- data-filter-reveal="true|false"
-
[li Element]
- data-role="list-divider"
- data-icon="name-icon"
- data-theme="name"
- data-filtertext="text"
Listviews
ul | ol Elementes
- data-autodividers="true"
-
Count bubbles [span Element]
- class="ui-li-count"
- data-theme="name"
- data-count-theme="name"
- data-divider-theme="name"
-
Images [img Element]
- src="path/images"
- class="ui-li-icon ui-corner-none"
- data-split-icon="name_icon"
- data-split-theme="name"
- class="ui-icon-alt"
Dialogs
a Element
- data-rel="dialog"
- data-transition="name_transition"
div Element
- data-role="dialog"
- data-close-btn="right|none"
- data-theme="name"
- data-corners="true|false"
Panels
div Element
- data-role="panel"
- data-display="push|overlay|reveal"
- data-position="left|right"
Accordion
div Elements Content
- data-role="collapsible-set"
- data-theme="name"
- data-content-theme="name"
- data-inset="false|true"
- data-mini="false|true"
- data-collapsed-icon="gear"
- data-expanded-icon="delete"
- data-iconpos="left|right|bottom|top"
- data-corners="true|false"
Accordion
div Element
- data-role="collapsible"
- data-collapsed-icon="gear"
- data-expanded-icon="delete"
- data-iconpos="left|right|bottom|top"
Sesión 2
PhoneGap + Jquery Mobile Parte 2
Hoy Aprenderemos
Programación Básica con Jquery Mobile
- DOM con jquery Mobile
- Eventos Jquery Mobile
- Métodos Jquery Mobile
Uso de Phonegap
- Accediendo a los recursos de PhoneGap
- Empaquetar
- Personalizar Apps Finales
Proyecto: App Cinepolis
Para profundizar en los temas, se recomienda acceder a la documentación oficial de las tecnologías. Phonegap y Jquery Mobile..
jquery core $()
// getElementsByTagName
$("div")

// getElementById
$("#idobject")

// getElementByClassName
$(".classname")

// Herencia
$("ol li")
$("#root a")

// Precisos
$("a.menu_item")
jquery CSS
// Agregando clases
$("string").addClass("classname");

// Eliminando clases
$("string").removeClass("classname");

// tiene esta clase ?
$("string").hasClass("classname");

// Modificación directa del CSS
$("string").css("propiedad", "valor");
jquery Core Events
function hola(){
	alert("Hola mundo");
}

// Click
$("button").click(hola);

// Doble Click
$("button").dblclick(hola);

// Hover
$("button").hover(hola);
jquery Anonymous Function
// Click
$("button").click(function(){
	alert("Esta es una función anónima");
});
jquery Callbacks
$.ajax({
	url: "local/dir",
	data: {},
	success: function(data){
		console.log(data);
	}
);
jquery mobile Events
// tap Event
$("string").on("tap", function(event){
		console.log(event);
	}
)

// orientation
$(window).on("orientationchange", function(event){
		console.log(event);
	}
);

// taphold
$("string").on("taphold", function(event){
		console.log(event);
	}
)

// taphold
$("string").on("swipeleft", function(event){
		console.log(event);
	}
)
Construyendo Nuestra App
Usando los recursos del dispositivo
- Camara
- Acelerometro
- Captura de Video y Audio
- Lista de Contactos
- Estatus de Conexión
- Brújula
- Geolocalización
- Acceso a Archivos
- Etc.
Phonegap: Cámara
app/AndroidManifest
<uses-permission android:name="android.permission.WRITE_EXTERNAL_STORAGE" />
app/res/xml/config.xml
<plugin name="Camera" value="org.apache.cordova.CameraLauncher" />
Javascript
navigator.camera.getPicture(onSuccess, onFail, { quality: 50,
    destinationType: Camera.DestinationType.FILE_URI });

function onSuccess(imageURI) {
    var image = document.getElementById('myImage');
    image.src = imageURI;
}

function onFail(message) {
    alert('Failed because: ' + message);
}
Phonegap: Acelerómetro
app/res/xml/config.xml
<plugin name="Accelerometer" value="org.apache.cordova.AccelListener" />
Javascript
function onSuccess(acceleration) {
    alert('Acceleration X: ' + acceleration.x + '\n' +
          'Acceleration Y: ' + acceleration.y + '\n' +
          'Acceleration Z: ' + acceleration.z + '\n' +
          'Timestamp: '      + acceleration.timestamp + '\n');
};

function onError() {
    alert('onError!');
};

navigator.accelerometer.getCurrentAcceleration(onSuccess, onError);
Phonegap: Brújula
app/res/xml/config.xml
<plugin name="Compass" value="org.apache.cordova.CompassListener" />
Javascript
function onSuccess(heading) {
    alert('Heading: ' + heading.magneticHeading);
};

function onError(error) {
    alert('CompassError: ' + error.code);
};

navigator.compass.getCurrentHeading(onSuccess, onError);
Phonegap: GPS
app/AndroidManifest
<uses-permission android:name="android.permission.ACCESS_COARSE_LOCATION" />
<uses-permission android:name="android.permission.ACCESS_FINE_LOCATION" />
<uses-permission android:name="android.permission.ACCESS_LOCATION_EXTRA_COMMANDS" />
app/res/xml/config.xml
<plugin name="Geolocation" value="org.apache.cordova.GeoBroker" />
Javascript
navigator.geolocation.getCurrentPosition(onSuccess, onError);

var onSuccess = function(position) {
	console.log('Latitude: ' + position.coords.latitude);
	console.log('Longitude: ' + position.coords.longitude);
	console.log('Altitude: ' + position.coords.altitude);
	console.log('Accuracy: ' + position.coords.accuracy);
	console.log('Altitude Accuracy: ' + position.coords.altitudeAccuracy);
	console.log('Heading: ' + position.coords.heading);
	console.log('Speed: ' + position.coords.speed);
	console.log('Timestamp: ' + position.timestamp);
};

function onError(error) {
    alert('code: ' + error.code + '. message: ' + error.message);
}
La aplicación del Día
Aplicación No-Oficial Cinépolis

El objetivo
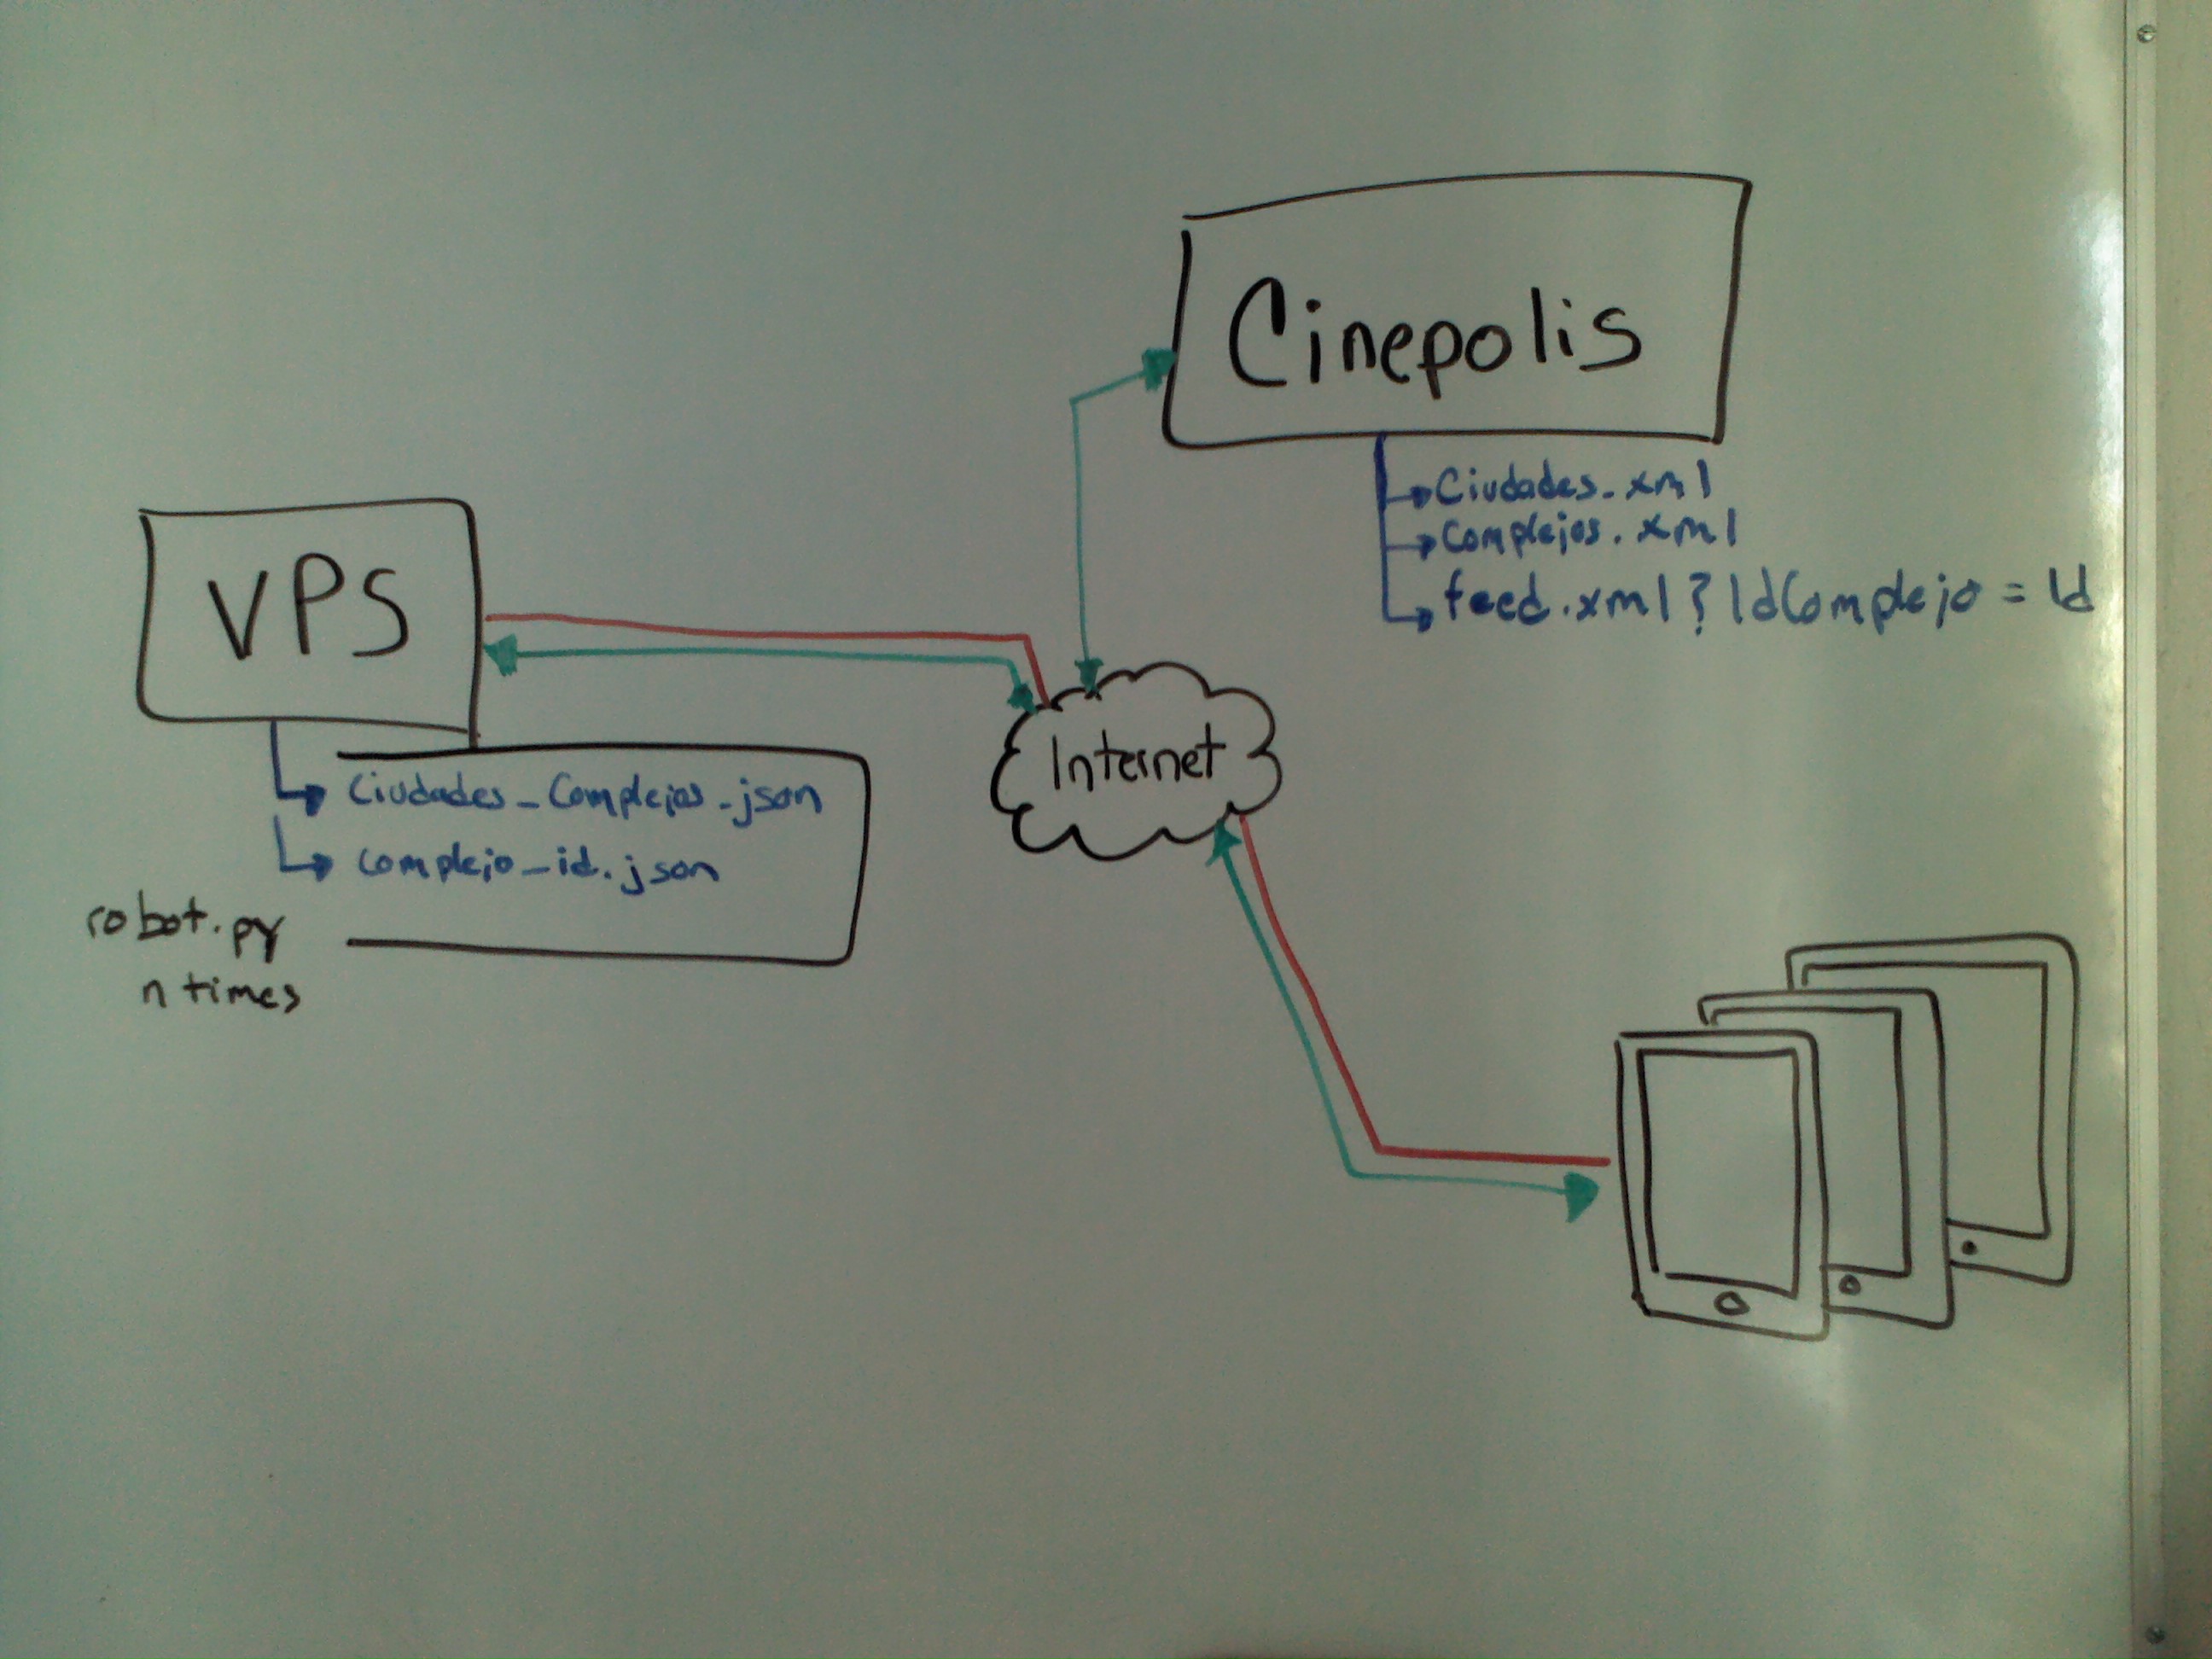
Generar una aplicación móvil que pueda obtener datos reales de la cartelera al día de Cinépolis y mostrarla de una forma ordenada, simple, básica, pero funcional y elegante.
La arquitectura
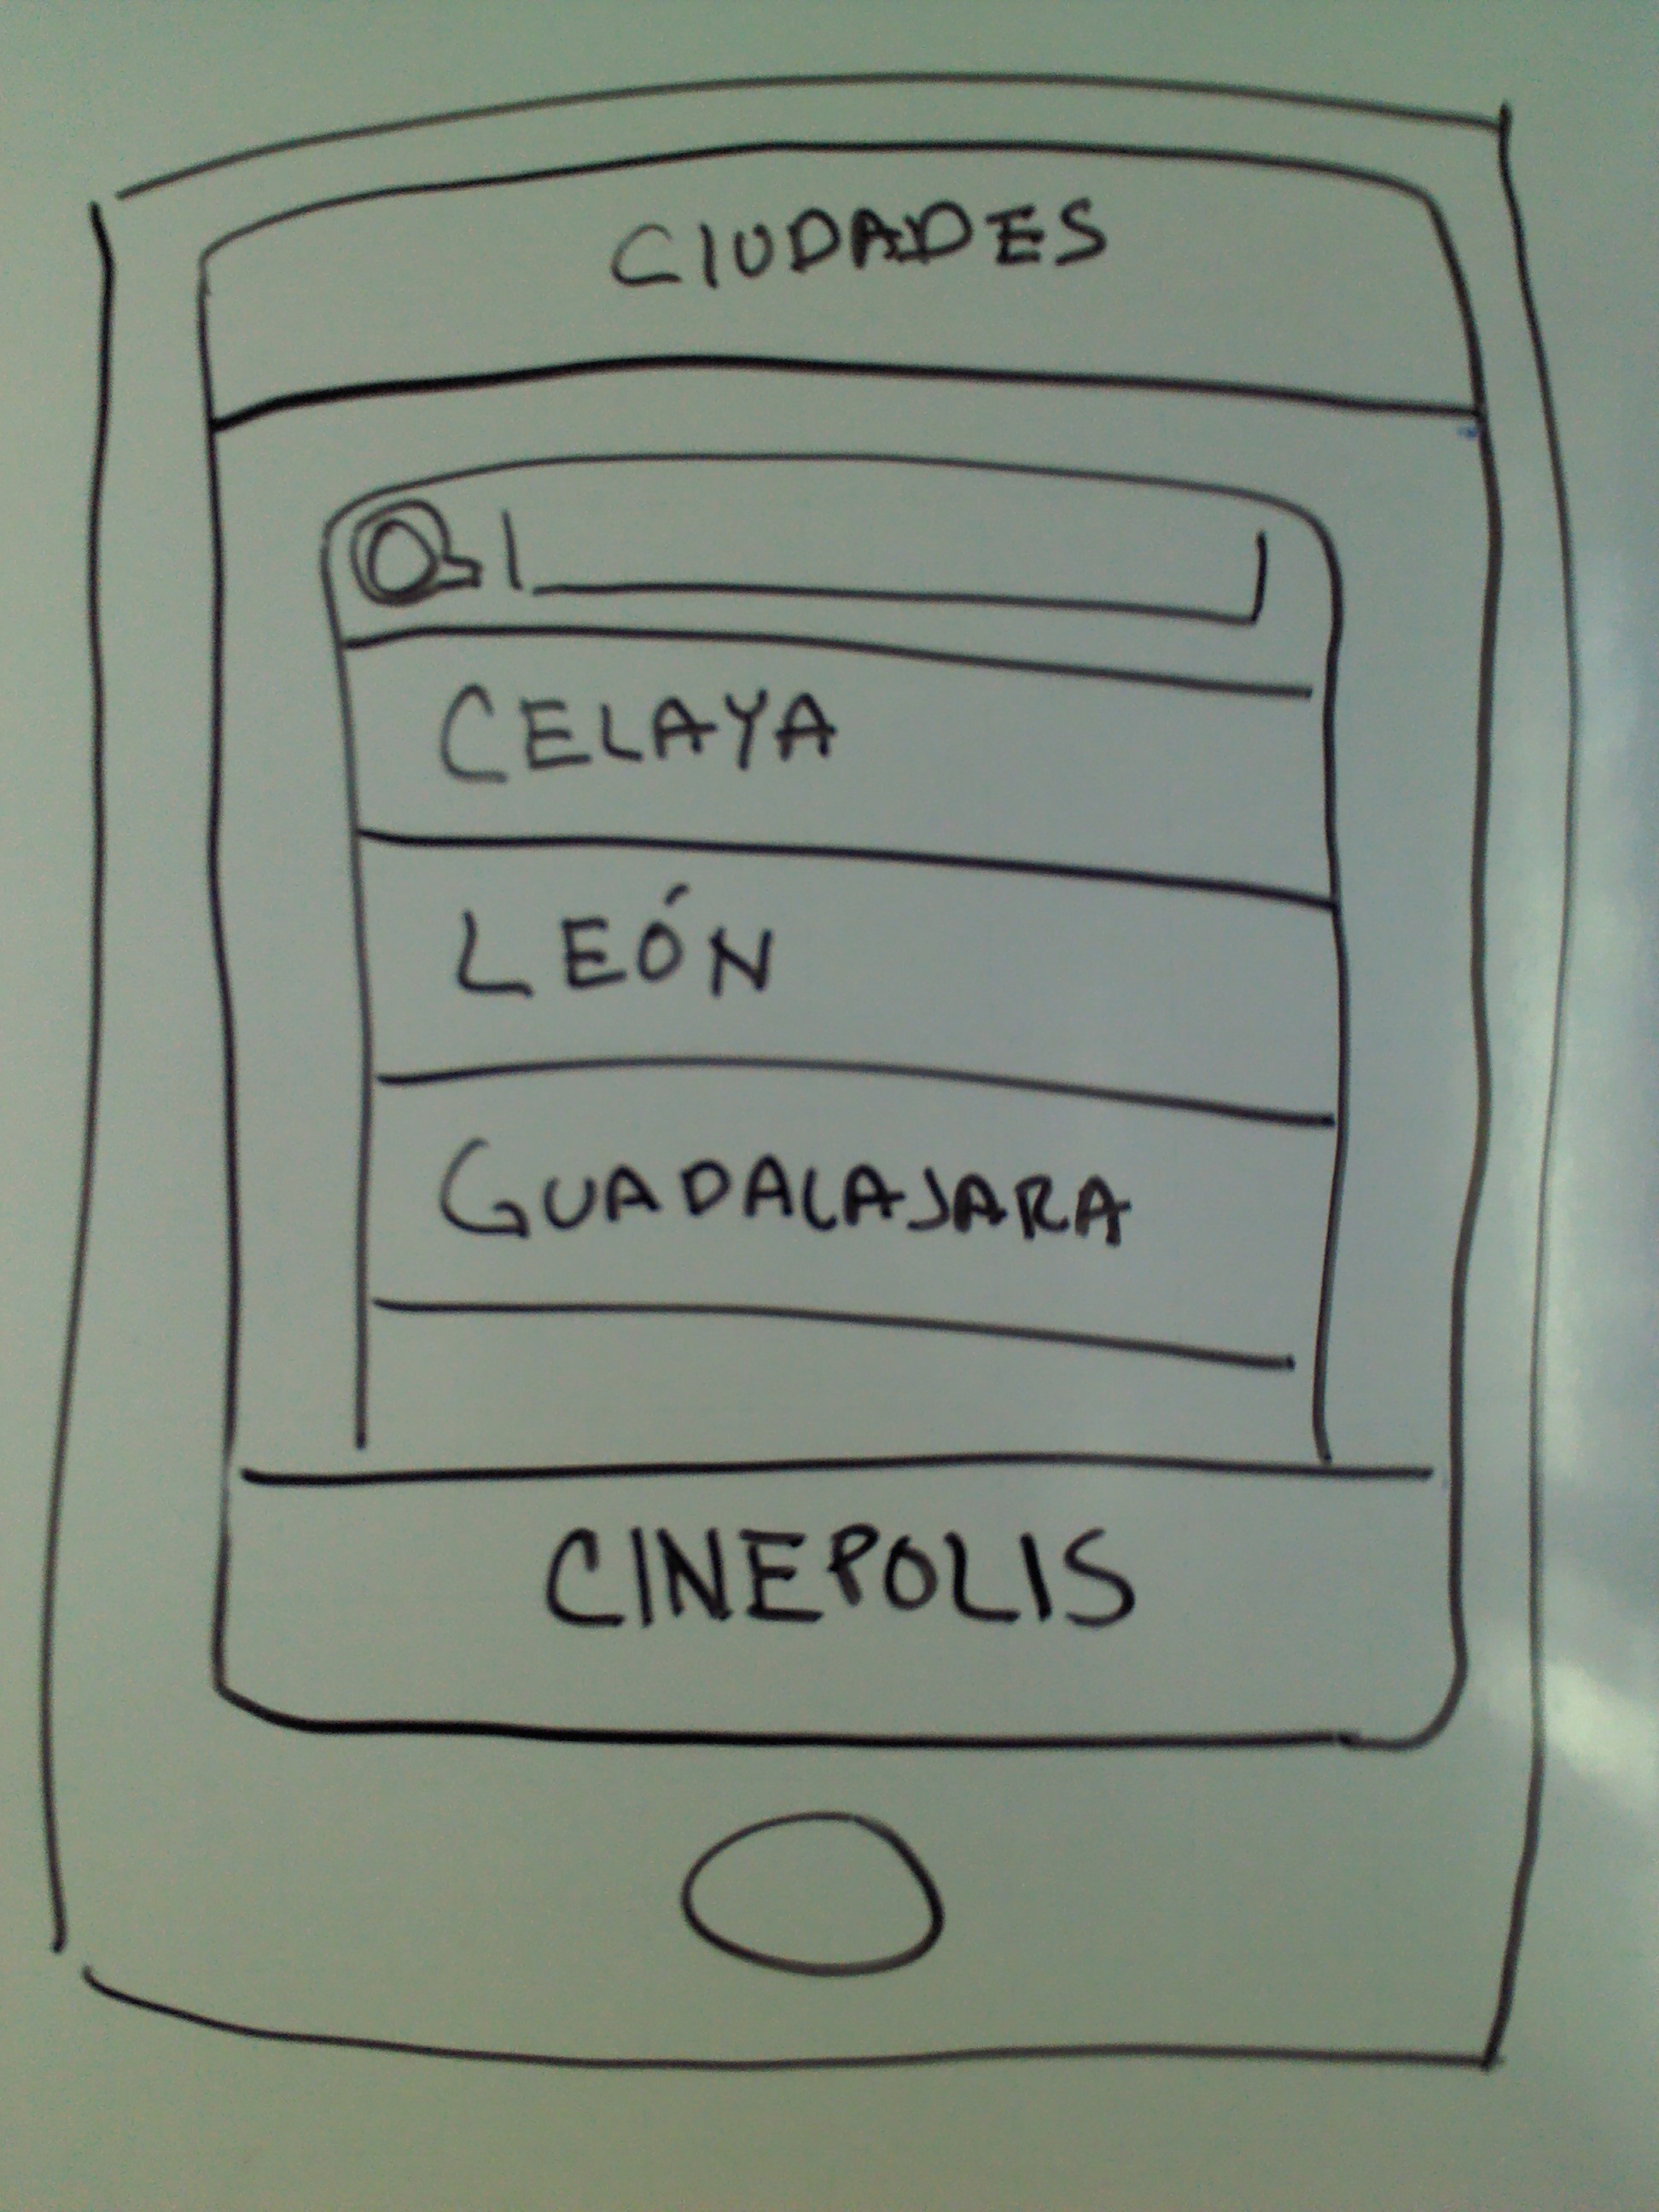
Los bocetos: Principal
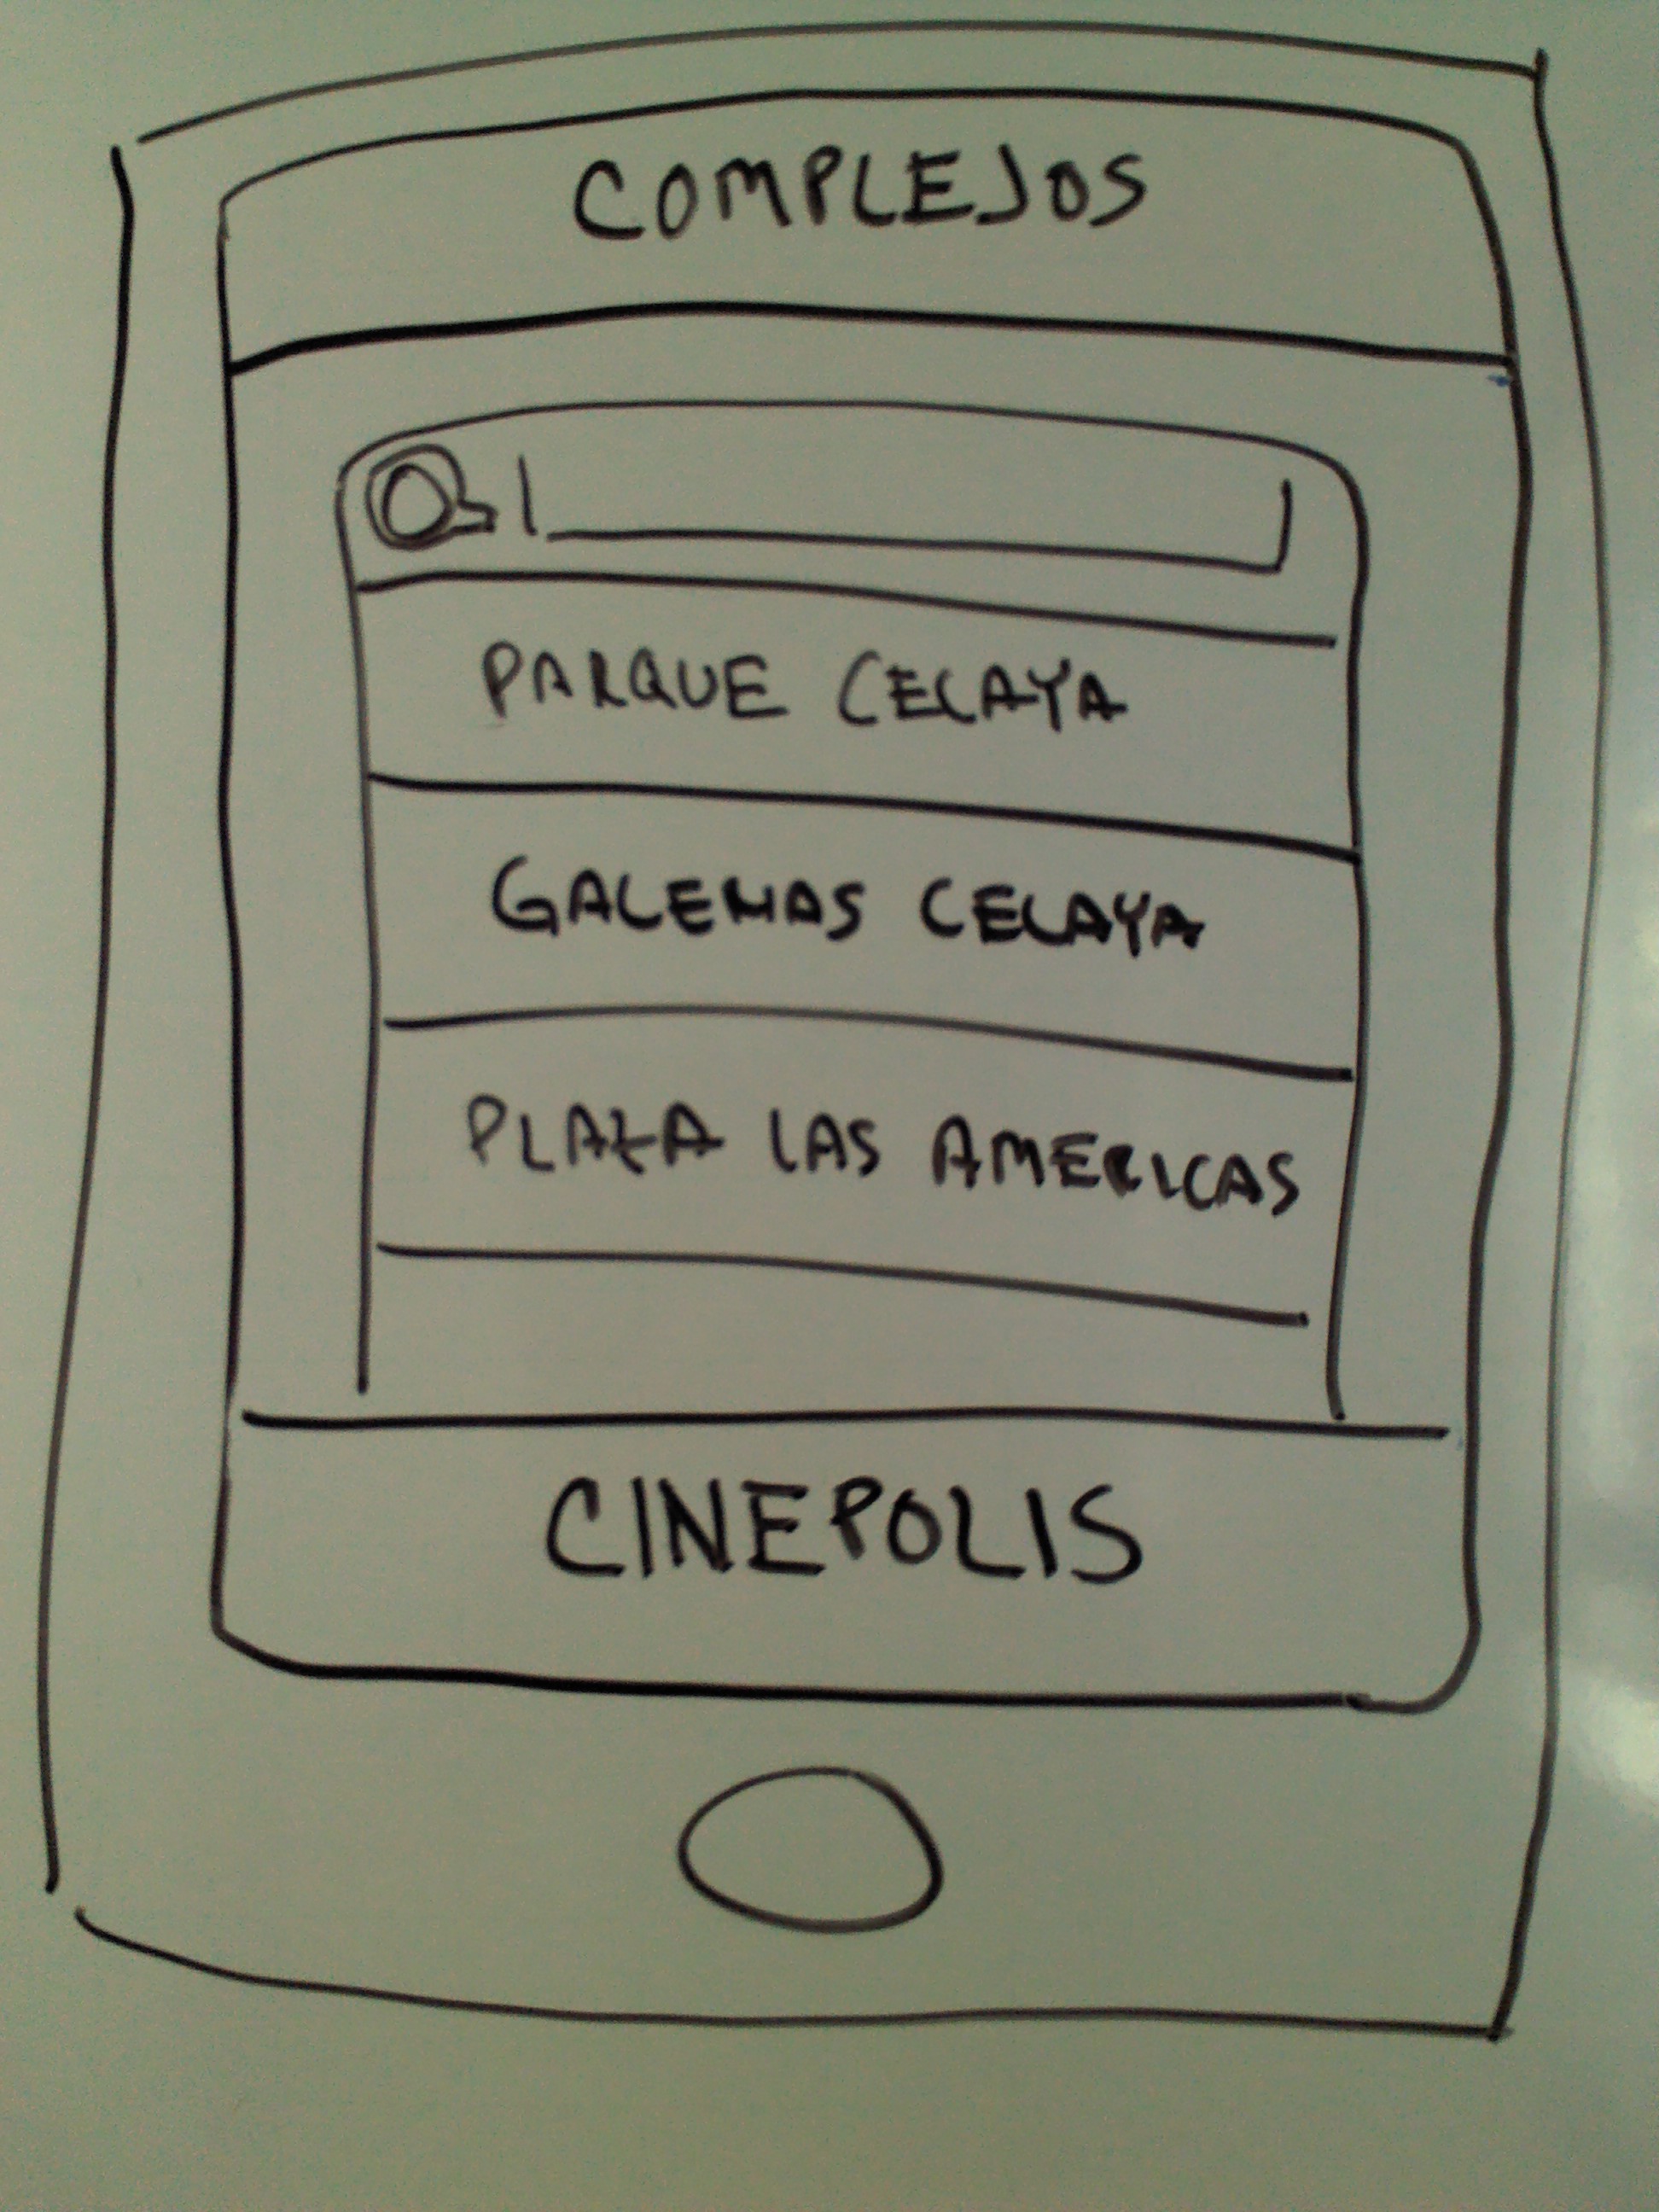
Los bocetos: Complejos
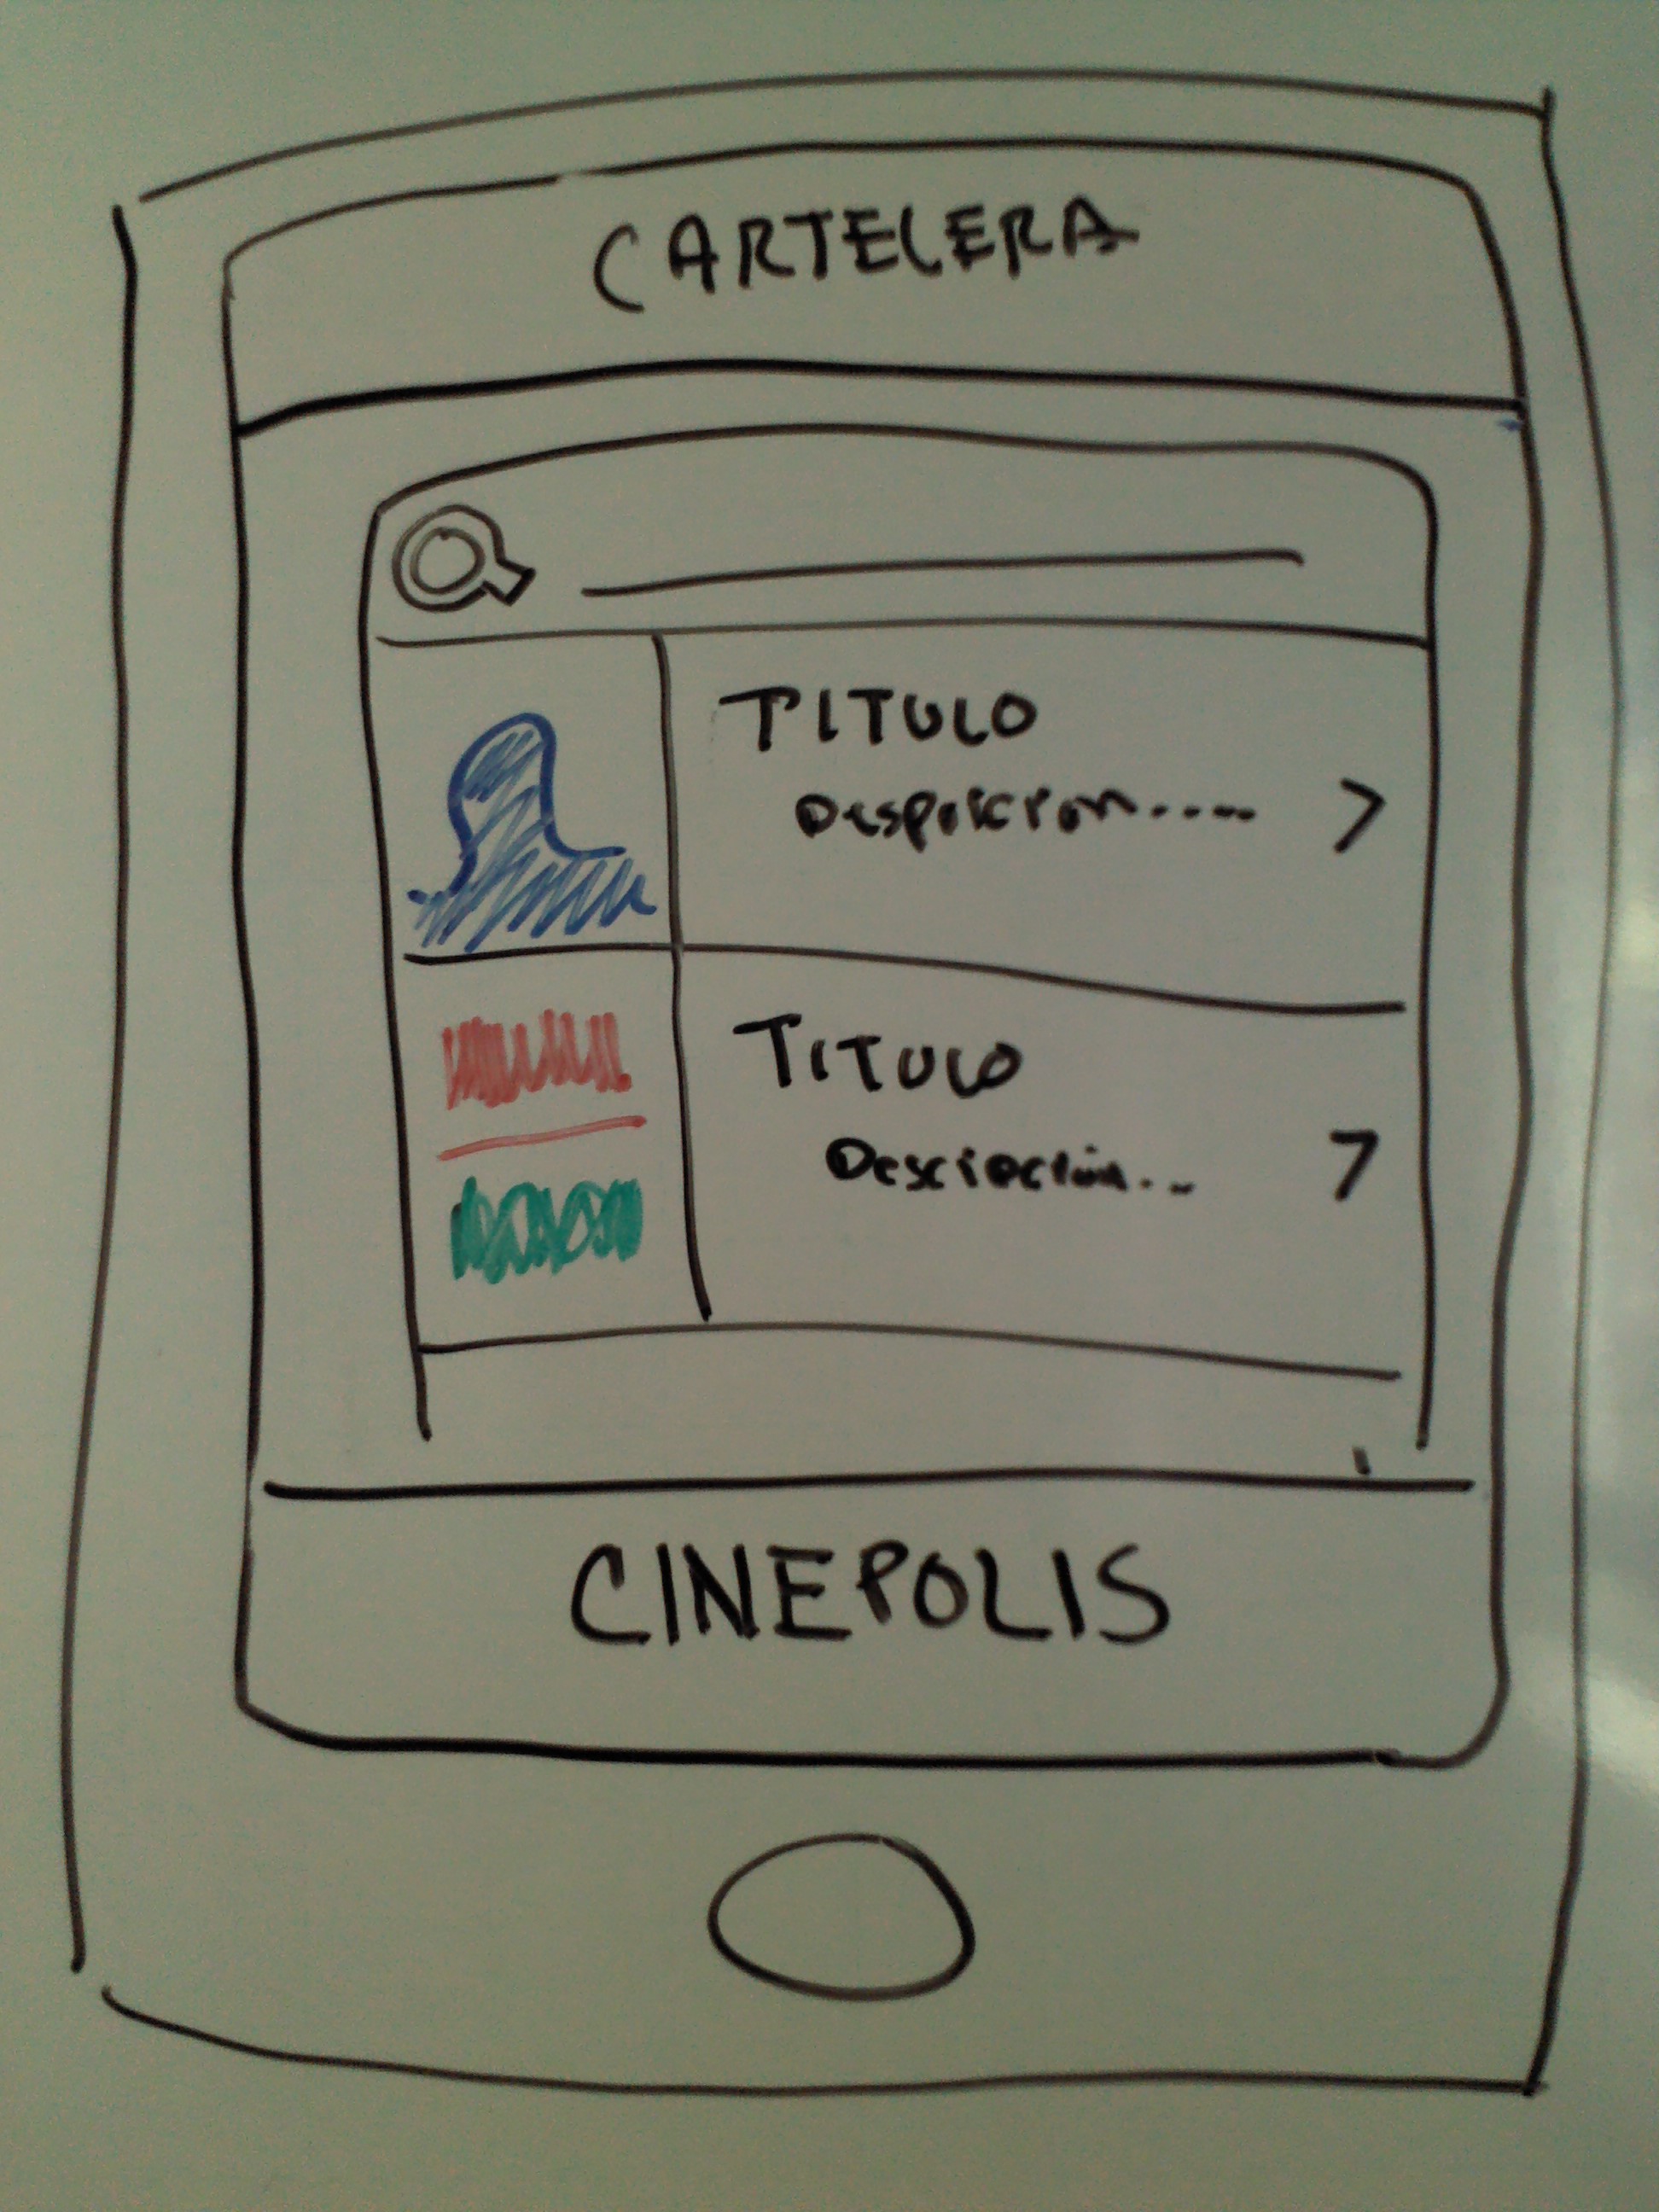
Los bocetos: Cartelera
Mános a la obra

a programar !!
Sesión 3
Utilerias: Git
Introducción al SDK
Hoy Aprenderemos
Uso de Git
- Creación de repositorios
- Entiendo su uso: checkouts, commits y push
- Los branchs
Introducción al SDK de Android
- Conceptos fundamentales
- Arquitectura
- Estructura
Proyecto: SimpleChat
Git y Github.com
At the heart of GitHub is an open source version control system (VCS) called Git*. Created by the same team that created Linux, Git is responsible for everything GitHub related that happens locally on your computer.
Git y Github.com
Add, Commit y otros comandos
git add . # Agrega todo el contenido modificado
git add README # Agrega solo un archivo
git commit -a -m "Agregando todo"
git commit -m "Agregando solo aquel que hizo add"
git push origin master
git status
git log
git rm
git mv
git checkout -- file
git reset HAED file
Los Branchs [ver]
git branch test
git checkout test
git checkout -b test # Este es equivalente a los 2 anteiores
vim README
git commit -a -m "Modificando README"
git checkout master
git merge test
git branch -d test
Introducción al desarrollo bajo el
SDK de Android
Que NO es Android
- Un dispositivo móvil
- Una implementación de JAVA ME
- Una marca telefónica
- La contraparte de iPhone por parte de Google
Nota: Tomada de unos viejos slides de un Taller de Android del 2011
Algunas características
-
Comunicación:
- Navegador Integrado (motor render webkit)
- Soporte a telefonía GSM
- Bluetooth, EDGE, 3G, LTE, Wifi.
-
Software:
- Gráficos basados en OpenGL
- Engine de Base de datos SQLite
- API Android Development (emulador, debugger, tools)
-
Hardware:
- Soporte Multimedia
- Cámara, Acelerometro
- GPS, Brújula
Nota: Tomada de unos viejos slides de un Taller de Android del 2011
Arquitectura
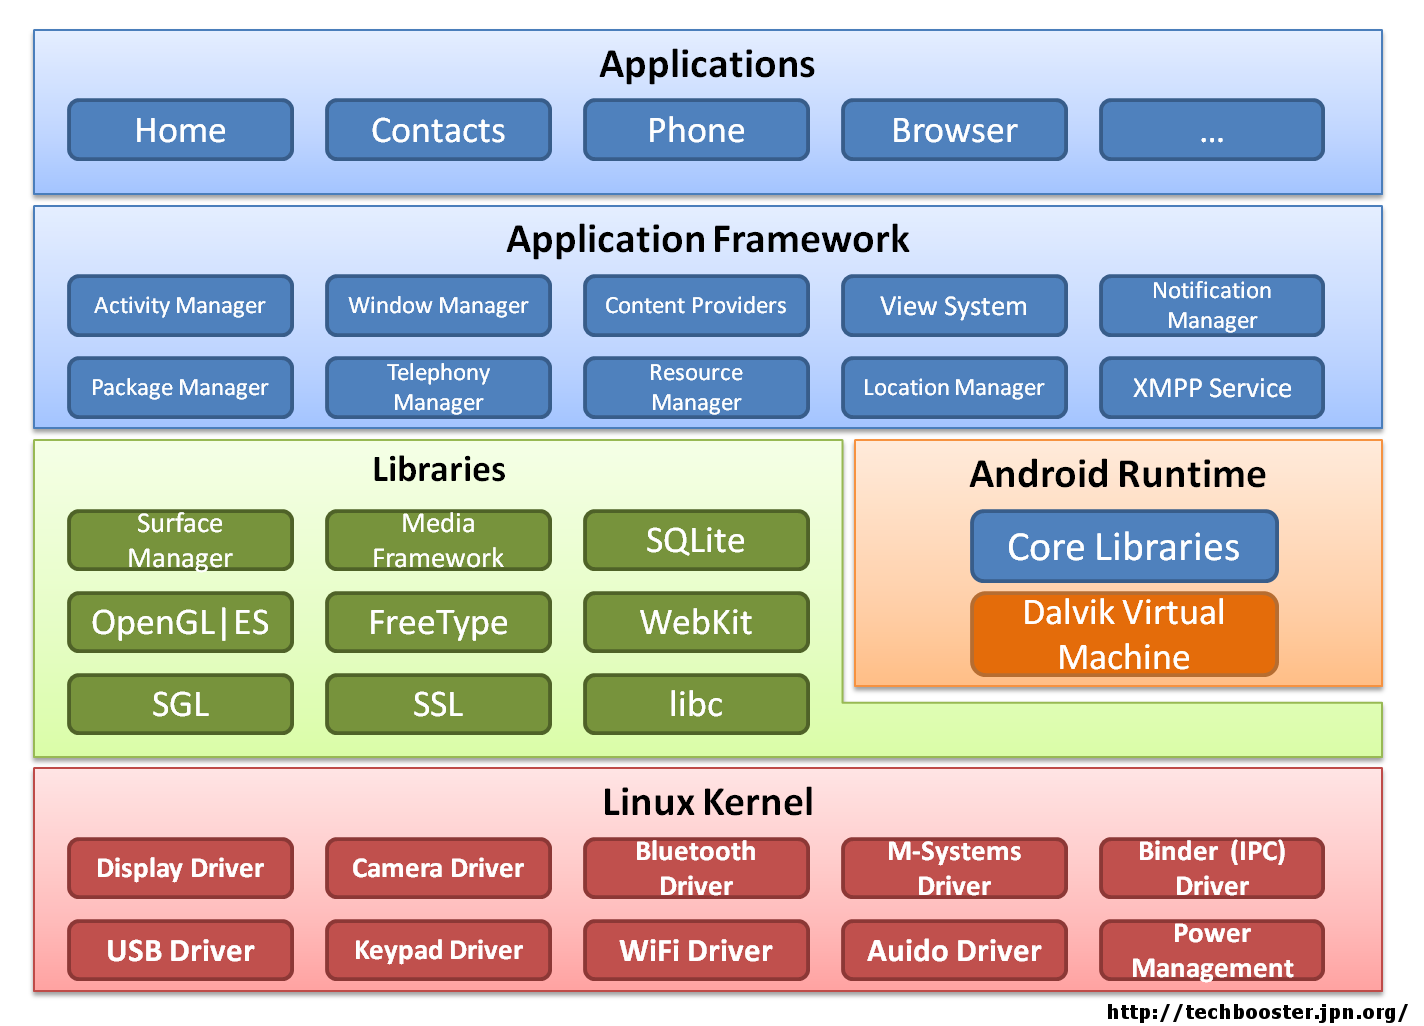
Componentes de una Aplicación
- Activity: Componentes representadas con una interfaz gráfica
- View: Representa la capa de Control
- Service: Componentes sin interfaz gráfica, corren bajo background.
- Content Provider: Mecanismo que permite compartir datos entre aplicaciones
- Broadcast Receiver: Componente destinado a detectar y reaccionar ante determinados mensajes o eventos globales generados por el sistema
- Widget: Elementos visuales, normalmente interactivos, que pueden mostrarse en la pantalla principal.
- Intent: Elemento básico de comunicación entre los distintos componentes Android
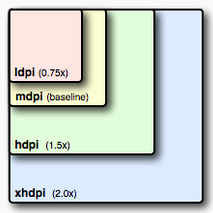
Lo referente a la resolución
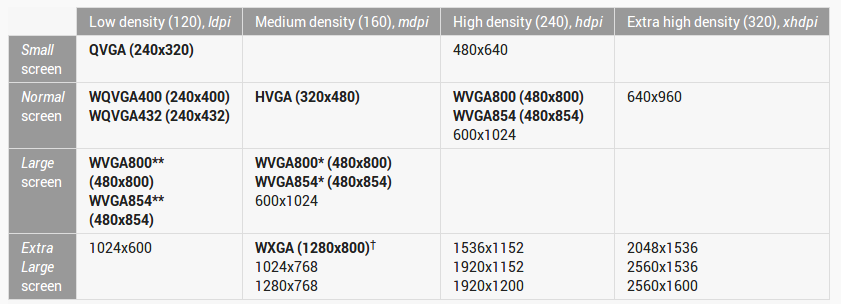
Lo referente a la resolución
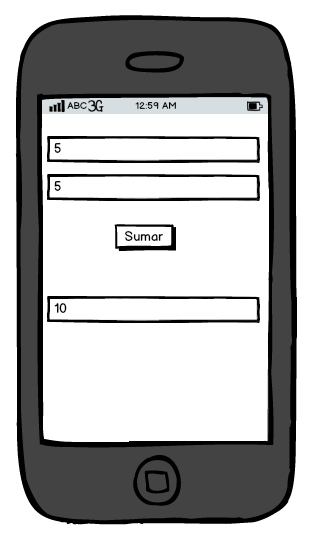
Desarrollando una App sencilla
Controles:
- Button
- EditText
- Toast
Aplicación Sumar
Sesión 4
Android SDK Parte 1
Hoy Aprenderemos
Funciones básicas
- Los Layouts
- Controles Básicos
- Controles de Selección
Proyecto: Pantalla Login
Nota: El contenido de esta sesión fue tomado del sitio sgoliver Curso de Programación Android
Los Layouts
- FrameLayout
- LinearLayout
- TableLayout
- GridLayout
- RelativeLayout
FrameLayout
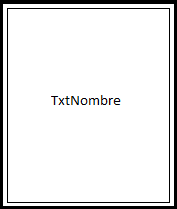
<FrameLayout
    xmlns:android="http://schemas.android.com/apk/res/android"
    android:layout_width="match_parent"
    android:layout_height="match_parent">

    <EditText android:id="@+id/TxtNombre"
        android:layout_width="match_parent"
        android:layout_height="match_parent"
        android:inputType="text" />

</FrameLayout>
LinearLayout
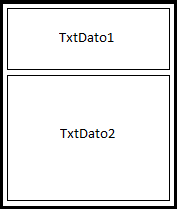
<LinearLayout
    xmlns:android="http://schemas.android.com/apk/res/android"
    android:layout_width="match_parent"
    android:layout_height="match_parent"
    android:orientation="vertical">

    <EditText android:id="@+id/TxtDato1"
        android:layout_width="match_parent"
        android:layout_height="match_parent"
        android:inputType="text"
        android:layout_weight="1" />

</LinearLayout>
TableLayout
<TableLayout
    xmlns:android="http://schemas.android.com/apk/res/android"
    android:layout_width="match_parent"
    android:layout_height="match_parent" >

    <TableRow>
        <TextView android:text="Celda 1.1" />
        <TextView android:text="Celda 1.2" />
        <TextView android:text="Celda 1.3" />
    </TableRow>

    <TableRow>
        <TextView android:text="Celda 2.1" />
        <TextView android:text="Celda 2.2" />
        <TextView android:text="Celda 2.3" />
    </TableRow>

    <TableRow>
        <TextView android:text="Celda 3.1"
               android:layout_span="2" />
        <TextView android:text="Celda 3.2" />
    </TableRow>
</TableLayout>
GridLayout
<GridLayout
    xmlns:android="http://schemas.android.com/apk/res/android"
    android:layout_width="match_parent"
    android:layout_height="match_parent"
    android:rowCount="2"
    android:columnCount="3"
    android:orientation="horizontal" >

        <TextView android:text="Celda 1.1" />
        <TextView android:text="Celda 1.2" />
        <TextView android:text="Celda 1.3" />

        <TextView android:text="Celda 2.1" />
        <TextView android:text="Celda 2.2" />
        <TextView android:text="Celda 2.3" />

        <TextView android:text="Celda 3.1"
               android:layout_columnSpan="2" />

        <TextView android:text="Celda 3.2" />

</GridLayout>
RelativeLayout
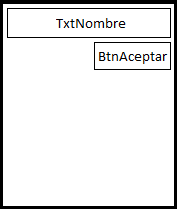
<RelativeLayout
        xmlns:android="http://schemas.android.com/apk/res/android"
        android:layout_width="match_parent"
        android:layout_height="match_parent" >

        <EditText android:id="@+id/TxtNombre"
              android:layout_width="match_parent"
              android:layout_height="wrap_content"
              android:inputType="text" />

        <Button android:id="@+id/BtnAceptar"
            android:layout_width="wrap_content"
            android:layout_height="wrap_content"
            android:layout_below="@id/TxtNombre"
            android:layout_alignParentRight="true" />
</RelativeLayout>
Controles Básicos
- Button
- ToggleButton
- ImageButton
- ImageView
- TextView
- EditText
- CheckBox
- RadioButton
Button
<Button android:id="@+id/BtnBoton1"
    android:text="@string/pulsame"
    android:layout_width="wrap_content"
    android:layout_height="wrap_content" />
btnBoton1 = (Button)findViewById(R.id.BtnBoton1);

btnBoton1.setOnClickListener(new View.OnClickListener() {
    public void onClick(View arg0)
    {
        lblMensaje.setText("Botón 1 pulsado!");
    }
});
ToggleButton
<ToggleButton android:id="@+id/BtnBoton2"
    android:textOn="@string/on"
    android:textOff="@string/off"
    android:layout_width="wrap_content"
    android:layout_height="wrap_content" />
btnBoton2 = (ToggleButton)findViewById(R.id.BtnBoton2);

btnBoton2.setOnClickListener(new View.OnClickListener() {
    public void onClick(View arg0)
    {
        if(btnBoton2.isChecked())
            lblMensaje.setText("Botón 2: ON");
        else
            lblMensaje.setText("Botón 2: OFF");
    }
});
ImageButton
<ImageButton android:id="@+id/BtnBoton3"
    android:layout_width="wrap_content"
    android:layout_height="wrap_content"
    android:contentDescription="@string/icono_ok"
    android:src="@drawable/ok" />
btnBoton3 = (Button)findViewById(R.id.BtnBoton3);

btnBoton3.setOnClickListener(new View.OnClickListener() {
    public void onClick(View arg0)
    {
        lblMensaje.setText("Botón 3 pulsado!");
    }
});
ImageView
<ImageView android:id="@+id/ImgFoto"
    android:layout_width="wrap_content"
    android:layout_height="wrap_content"
    android:src="@drawable/icon"
    android:contentDescription="@string/imagen_ejemplo" />
ImageView img= (ImageView)findViewById(R.id.ImgFoto);
img.setImageResource(R.drawable.icon);
TextView
<TextView android:id="@+id/LblEtiqueta"
    android:layout_width="matchfill_parent"
    android:layout_height="wrap_content"
    android:text="@string/escribe_algoEscribe algo:"
    android:background="#AA44FF"
    android:typeface="monospace" />
final TextView lblEtiqueta = (TextView)findViewById(R.id.LblEtiqueta);
String texto = lblEtiqueta.getText().toString();
texto += "123";
lblEtiqueta.setText(texto);
lblEtiqueta.setBackgroundColor(Color.BLUE);
EditText
<EditText android:id="@+id/TxtTexto"
    android:layout_width="match_parent"
    android:layout_height="wrap_content"
    android:inputType="text" />
final EditText txtTexto = (EditText)findViewById(R.id.TxtTexto);
String texto = txtTexto.getText().toString();
txtTexto.setText("Hola mundo!")
Controles de Selección
- Spinner
- ListView
- GridView
Spinner
<Spinner android:id="@+id/CmbOpciones"
    android:layout_width="match_parent"
    android:layout_height="wrap_content" />
cmbOpciones = (Spinner)findViewById(R.id.CmbOpciones);

final String[] datos =
        new String[]{"Elem1","Elem2","Elem3","Elem4","Elem5"};

ArrayAdapter<String> adaptador =
        new ArrayAdapter<String>(this,
            android.R.layout.simple_spinner_item, datos);

adaptador.setDropDownViewResource(
                android.R.layout.simple_spinner_dropdown_item);

cmbOpciones.setAdapter(adaptador);

cmbOpciones.setOnItemSelectedListener(
        	new AdapterView.OnItemSelectedListener() {
                public void onItemSelected(AdapterView parent,
                    android.view.View v, int position, long id) {
                        lblMensaje.setText("Seleccionado: " + datos[position]);
                }

                public void onNothingSelected(AdapterView parent) {
                    lblMensaje.setText("");
                }
        });
ListView
<ListView android:id="@+id/LstOpciones"
        android:layout_width="wrap_content"
        android:layout_height="wrap_content" />
final String[] datos =
    new String[]{"Elem1","Elem2","Elem3","Elem4","Elem5"};

ArrayAdapter<String> adaptador =
    new ArrayAdapter<String>(this,
        android.R.layout.simple_list_item_1, datos);

lstOpciones = (ListView)findViewById(R.id.LstOpciones);

lstOpciones.setAdapter(adaptador);
GridView
<GridView android:id="@+id/GridOpciones"
    android:layout_width="match_parent"
    android:layout_height="match_parent"
    android:numColumns="auto_fit"
    android:columnWidth="80px"
    android:horizontalSpacing="5dp"
    android:verticalSpacing="10dp"
    android:stretchMode="columnWidth" />
private String[] datos = new String[25];
//...
for(int i=1; i<=25; i++)
        datos[i-1] = "Dato " + i;

ArrayAdapter<String> adaptador =
        new ArrayAdapter<String>(this, android.R.layout.simple_list_item_1, datos);

grdOpciones = (GridView)findViewById(R.id.GridOpciones);

grdOpciones.setAdapter(adaptador);
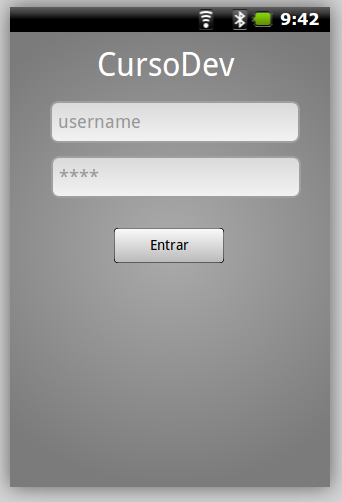
Aplicación Login
Simple aplicación que verifica la autenticidad de un usuario
Sesión 5
Android SDK Parte 2
Hoy Aprenderemos
Funciones avanzadas
- SQLite
- Conexión a Base de Datos
- Manipulación de Base de Datos
Nota: El contenido de esta sesión fue tomado del sitio sgoliver Curso de Programación Android
Que es SQLite
Is a relational database management system contained in a small (~350 KB) C programming library.
SQLite is ACID-compliant and implements most of the SQL standard, using a dynamically and weakly typed SQL syntax that does not guarantee the domain integrity.
SQLiteOpenHelper
import android.content.Context;
import android.database.sqlite.SQLiteDatabase;
import android.database.sqlite.SQLiteDatabase.CursorFactory;
import android.database.sqlite.SQLiteOpenHelper;

public class UsuariosSQLiteHelper extends SQLiteOpenHelper {

    String sqlCreate = "...";

    public UsuariosSQLiteHelper(Context contexto, String name,
                               CursorFactory factory, int version) {
        super(contexto, name, factory, version);
    }

    @Override
    public void onCreate(SQLiteDatabase db) {
        db.execSQL(sqlCreate);
    }

    @Override
    public void onUpgrade(SQLiteDatabase db, int versionAnterior, int versionNueva) {

    }
}
SQLiteOpenHelper
import android.app.Activity;
import android.database.sqlite.SQLiteDatabase;
import android.os.Bundle;

public class MiActividad extends Activity
{
    @Override
    public void onCreate(Bundle savedInstanceState)
    {
        super.onCreate(savedInstanceState);
        setContentView(R.layout.main);

        UsuariosSQLiteHelper usdbh = new UsuariosSQLiteHelper(this, "MiBasededatos", null, 1);

        SQLiteDatabase db = usdbh.getWritableDatabase();

    }
}
El primer INSERT SQL
db.execSQL("INSERT INTO tabla (campo1,campo2) VALUES ('valor1','valor2') ");
Un poco mas de SQL [UPDATE, DELETE]
db.execSQL("DELETE FROM tabla WHERE campo1='valor1' ");

db.execSQL("UPDATE tabla SET campo1='valor1' WHERE campo2='valor2' ");
Los Cursores
String[] args = new String[] {"valor1"};
Cursor c = db.rawQuery("SELECT * FROM tabla WHERE campo1=? ", args);

if (c.moveToFirst()) {

     do {
          String campo1 = c.getString(0);
          String campo2 = c.getString(1);
     } while(c.moveToNext());
}
Sesión 6
Genera un Proyecto

Pensar que la escuela te debe enseñar todo, es símbolo de que algo debes cambiar en tu aprendizaje.

Si tienes una gran idea por hacer, has perdido 5 segundos valiosos de tu tiempo leyendo esta frase.